Perilous Silks

The Perils of using Silk in your work
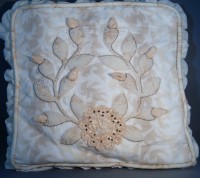
I took a hand appliqué class several years ago.  The project was this wonderful little pillow with a design reminiscent of a Baltimore Album square.  The fabrics were supplied by the teacher, some probably from her stash.  The lovely monochrome color scheme and the use of silk for the flower buds and rouched blossom added a sophistication to the design.

The little pillow has been a part of the collection on my living room couch during the summer and part of the dining room collection the rest of the year. It has been admired and handled gently as interesting pillows will be.  Recently I noticed that there were tiny pieces of what looked like fine threads here and there on the couch.  On closer inspection I realized that the silk buds and rouched blossom were the source of the minute threads.  The beautiful silk had begun to fracture.

All that work and it was disintegrating before my eyes.  There was no way of knowing how old the silk was when I used it, and using some kind of stabilizer would not have been an option as it would have increased the bulk of the delicate buds and prevented the soft folds in the rouched blossom.

Needless to say, I am very disappointed.  Replacing the silk elements is certainly a possibility but it means removing some of the decorative embroidery and beading as well.  Somehow things never seem to go back together looking unaltered but I will give it a try – some day!

The lessons I have learned are: know the age and history of your fabrics when at all possible, and choose fabrics that are the most stable and sturdy for the purpose intended. A better choice than silk for a piece that is subject to light, temperature, humidity and handling would have been an imitation silk.  They are amazingly silk-like with a soft hand and drape. Because they are made from man made fibers like nylon and etc. they are stable and sturdy without the fracturing over time.

The final lesson is: be able to live with the choices you make because repairs are costly in time and counter productive.  If you are selling or giving away your creations you do not want them to come back because of poor choices in materials or workmanship.

We all love to use antique and recycled textiles in our work – they are charming and responsible.  However, if you want your hard work to last, be aware of their content and condition.  Linen seems to last for ever, silk not so much.

Choose wisely!

Have you had a similar experience with older textiles?  Let us know.  Leave a comment.

Ever curious,

Linda

Bleach Painting Update

I recently experimented with the new “splash-less” chrlorine bleach.  The viscosity is slightly thicker than regular bleach so I thought I would try to paint with it without using a thickener.

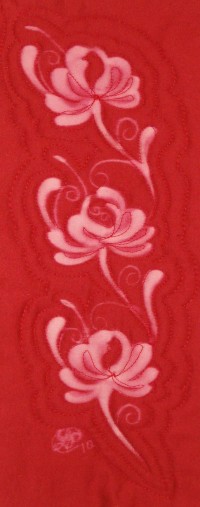
The result,  Roses are Red, is quite pleasing although the edges of the design are not as sharp and hard as with the thickened bleach.  Selectively lightening small areas by controlling the bleach  to create lighter areas for highlights was really tricky while the fabric was still  damp.  I used a hair dryer on these areas and the results were a little better.  The real trick is to carefully control the amount of bleach in your brush just as with unthickened paint or dye – and to practice.

I don’t think any amount of practice though, would result in the crisp well defined edges you get with a thickener.  However,  the ability to create a beautiful controlled design with minimal preparation is well worth keeping this technique in your arsenal.

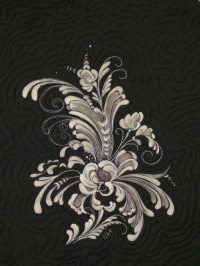
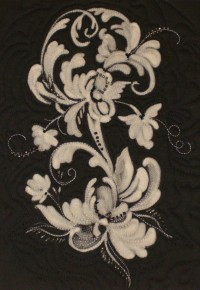
The soft edges of Roses are Red create an impressionistic effect.   The crisp hard edges of Rosemaling have a more graphic linear effect.  Which is your style?

Give it a try!

Any questions on any of my posts, please don’t hesitate to contact me and do leave a comment.

Ever curious,

Linda
Designing Marionettes – Weight

Part Three – Weight

I have found that when I am designing a marionette it is important to keep three very important principals in mind – Movement, Balance and Weight.  This post will address the third and final principal.

Weight – Understanding how Weight and Gravity work to give your marionette realistic movement.

Unlike hand and rod puppets that rely on our hands to begin and complete a movement, marionettes rely on us to initiate the movement and gravity to complete it.  A string is manipulated to lift an arm or leg and then released allowing gravity to return the body part to a position creating a movement.  The head strings are lowered to seat the figure or make it bow.

If the hands, feet or head are not heavy enough, the figure will not move realistically.  It really doesn’t matter what the extremities are made of as long as the hands and feet weigh more.

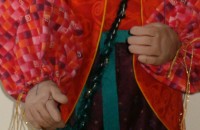
Lucy is made entirely of wood with a polymer clay head which gives her plenty of weight – in fact, she is almost too heavy to manipulate for an extended length of time.  However, her movements are fluid and so realistic that my young grandson thought she was alive.  Her hands and feet are carved wood which is the traditional material.  It is perfect weight and fun to carve.

Heads

I have found that polymer clay over an aluminum foil core can be too heavy for head material.  Paper clay over Styrofoam seems to work nicely and has enough weight to do the job.  The dried paper clay supports the head rod well and is fairly easy to sand and paint.

Hands and Feet

My favorite material to create hands and feet is polymer clay.  It is wonderful to sculpt, comes in great colors and has the right amount of weight.  When I use fabric to create the arms and legs, I make a clay lip where the hand or foot will attached to the extremity. That way they can be inserted into the arm/leg fabric tube and fastened easily.

Marionettes come in all types of characters, not all of which are human.  Sculpting for animals is a fun challenge where reference photos are a must for some semblance of realism.

Unless of course you are creating a fanciful character – that is when the wonderful colors let your creativity soar.

Have Fun !

Ever curious,

Linda

Heading to DC this Summer?

I was just looking at the Summer Calendar for the Textile Museum in Washington, DC, and it is filled with interesting exhibits and events for the Textile Artist.  In particular is ” The World of Color in Contemporary Art Quilts” on Saturday July 24th.  The Summer Workshop Series has some great classes including silk painting and screening. 

Unfortunately, when I head in that direction this time of year, it is usually to the shores of the Chesapeake but my visits to the Museum is always a wonderful surprise.  It is very small but full of impact.  It’s in the Embasy District and the architecture in the area is amazing. 

If you’re not headed in that direction, check out the web-site.  It is full of great information and eye candy.

Ever curious,

Linda 

:: Textile Museum ::.

Now Lets Paint with Bleach

Controlled Discharge with Chlorine Bleach…cont.

After creating several art pieces by painting with thickened dyes on fabric, I wanted to experiment with creating detailed designs on a dark fabric background without having to dye the entire piece.  My familiarity with thickening dyes and paints with sodium alginate led me to experiment with discharging my designs with thickened chlorine bleach.

Now Lets Paint!

Tape your fabric to a hard, non porous surface that won’t be damaged by the bleach.   Be sure that your fabric is straight, smooth and taught.  Trace your pattern on to the fabric.  I use the same light colored wax-free transfer paper that I use for transferring designs onto wood (Saral).  It will disappear as you paint over it and any residue will wash out.

Mix up your bleach/alginate medium – 1Tbs. each adjusting to a heavy cream consistency.  The minimal amount of bleach that I use – maybe 1/4 cup max for the total project, mixed with the alginate gives off very little fumes but keep your work area well ventilated.  Keep your bleach container and alginate covered when not in use.

Now just like you are painting on a canvas or paper, load your brush with medium and stroke it on to the fabric following your design and the contours of the elements.  Brush on one coat and move to a dry area letting the bleach/alginate medium dry.  Take note of the color that has discharged and the value that remains.  I found that once the medium dried, the bleaching action pretty much stops.  This allows a nice opportunity for shading elements as you go.

Repaint over the dried medium in areas that you want to be lighter.  At this point I often use a touch of straight bleach in my brush.  The dried alginate will keep the bleach from spreading out of the design area as long as you are not carrying too much bleach in your brush.  Practice loading your brush and dragging off excess on the sided of your cup or tapping extra bleach onto a paper towel.  Remember that a little goes a long way.  Let these areas dry, re-evaluate your color values and re-paint highlight areas if necessary.

When you are satisfied with how it looks, let it dry.  I still dip the finished piece into a water vinegar mix to stop the bleaching action (or use what ever method you are comfortable with).  Use a little gentle finger rubbing on areas that are resisting.  Once the medium is washed out, wash and iron your fabric like you would any other textile piece.

Quilt and embellish!

If you have any questions, please contact me.  I would love to see any of your creations.

Have Fun !!!!

Ever curious,

Linda

Controlled Discharge with Bleach


Part One of Two

After creating several art pieces by painting with thickened dyes on fabric, I wanted to experiment with creating detailed designs on a dark fabric background without having to dye the entire piece.  My familiarity with thickening dyes and paints with sodium alginate led me to experiment with discharging my designs with thickened chlorine bleach.

Much to my amazement it worked beautifully!  I used black cotton sateen purchased at my local chain fabric store and found that it discharged to a very nice bright off-white and many shades in between.  I suggest purchasing a very small amount of fabric (1/8 yard) and try it out for color.  All fabrics discharge differently creating a wide variety of residual colors.  Black is particularly tricky as black dyes are produced by combining many colors.  If you like the results purchase the quantity you need for your project.   

I prepare my sodium alginate with plain water like I would for dye paints.  Be sure to use fresh chlorine bleach – it does degrade in even a tightly closed container over time.  The great thing about this method is that the amount of bleach you will be using is very minimal. 

 Do not mix the bleach with the  alginate until you are ready to paint – then only mix a very small quantity at a time, I use about 1Tbs. of each mixed in a small glass custard cup, but adjust to a heavy cream consistancy.  It will go a long way because you will be painting it on with brushes.  Once mixed, it will not keep longer than one session as the bleach will degrade the sodium alginate.  Throw away any mixture at the end of the day and make a fresh mix the next time you want to paint.

My favorite brushes for this and dye/painting are synthetic filberts, rounds and liners.  The synthetic bristles will stand up to the bleach and dye chemicals.  

Next Post – Lets Paint with Bleach

Ever curious,

Linda

Designing Marionettes – Balance

I have found that when I am designing a marionette it is important to keep three very important principals in mind – Movement, Balance and Weight.  This post will address the second principal.

Balance – Understanding the Center of Balance.

All things have a center of balance, the point at which the force of gravity is equal from top to bottom allowing them to remain upright and not topple over helter skelter.  Unlike a statue, your marionette doesn’t have to stand alone relying on its center of gravity to keep it erect.  Both you as the manipulator and gravity control the movements of your puppet as it dangles from its strings.  You provide the energy of movement and gravity returns the energy to a resting position.

If you designed it correctly, the puppet will hang evenly balanced with its head centered and lined directly over the trunk (human form) and arms and legs fall straight from the shoulders and hips, respectively.  Some marionettes, like my Lucy, are segmented between the waist and hips to facilitate bending at the waist independently from the legs as we do.

The proper placement of the four main strings also helps you and gravity to keep a well balanced character.  Traditionally strings are tied on both sides of the head just above the ear area which when loosened drops the head forward and when tightened, raises the head.  If they are twisted, the head will turn in either direction. 

The third and fourth strings are tied to the shoulders. These strings carry the full weight of the puppet and therefore provide the center of balance.  A fifth string can be tied to the lower back to help control bending and sitting.  Then of course there are strings tied to each wrist or hand if the hands are stationary, and just above each knee area to lift the legs for walking. Watch carefully as you move and picture strings at these points. You will understand why the strings are placed so specifically.  

Next Post – Weight

Ever Curious,

Linda

Three New Items For Sale

Three New Items have been added For Sale. 

There are two new Batik PaintingsSea Scallops with Barnacles and the other is Butterfly.   

I have also added a new Textile item For Sale.  It is a Pod loaded with beautiful Ribbon Flowers, Beads and Embellishments.  It is called Pod of Ribbon Flowers.

Please take a moment and check them out.

Ever curious,

Linda

Endless Winter

I just returned from a long weekend at our little camp in Northern Vermont.  The weather was warm and sunny, the  frost is out of the ground and the drifts of Queen Ann’s Lace have replaced the snow banks along the roadsides.   Summer has finally come to the North Woods! 

Our neighbors are plowing the fields to plant corn and the cows and horses are grazing lazily on the new pasture grasses.  In the distance however, the buzzing sound of chain saws and tractors cutting hay washes over the landscape.  Winter has ended but next winter looms on the horizon for the people of the North Woods.  It will take all summer to cut, split, stack and season firewood for next winter.  All summer to cut and bale hay for the livestock who rely on the farmers for lots of  food to sustain them over the long cold winters.  This weekend was “First Cut” haying, the most nutritious if baled at just the right time.  Wood must also be cut and readied for the “boiling” durng maple sugaring season next spring. 

For those of us who just turn up the thermostat and locate our mittens when it gets cold, the concept of spending all summer getting ready for next winter is something I have never given a second thought to – until we built our little camp.  Having plenty of nice dry, seasoned split wood is  necessary in order for us to spend time at camp in the winter.  Soooo, during the summer we also spend a good amount of time readying the store of wood for next winter.  It is hard work but very satisfying to know that we will be warm and cozy during our visits.

When I’m stacking wood I often think about a program that I watched on tv a few years ago where several modern families were chosen to live for a summer as the Pioneers did somewhere in the Midwest .  Part of their daily chores were to prepare for winter.  At the end of their experience they were graded on their rediness –  seasoned wood, preserved food and fodder for the livestock.  Not one family and their livestock would have survived.  I add a few more logs to the stack.

Ever curious,

Linda

Designing Marionettes – Realistic Movement

I have found that when I am designing a marionette it is important to keep three very important principals in mind – Movement, Balance and Weight.  This post will address the first principal.

 Movement – Understanding the body’s range of movement to create a realistic character.

 If the character is human-like, the range of movement that the human body can achieve must be understood and taken into consideration.  For example, the limitations of the elbow and knee joints – our elbows and knees only bend in one direction but our arms and legs have a full range of motion, and our heads don’t turn completely around.  

Designing your marionette’s joints with these features in mind will not only make its movements realistic but will also make manipulating the puppet much easier.  Arms and legs will react normally when a string is tightened or loosened.  Ideally, elbow and knee joints  should have stops to keep them from hyper extending.  If your building material is rigid, making  the joints meet at 45 degree angles can help.  You can also control hyper-extension by making sure the strings are just long enough to remain taught when the limbs are at rest.       

 Movement is also governed by the costumes that you design for your characters.  It isn’t quite like dressing a doll. Dolls do not move so their clothes do not have to accommodate motion.  A marionette’s clothing must have ease built in much like our own clothing.  Ease must be added in the shoulder and thigh areas in particular so that your puppet can raise its arms and legs, sit, kneel and bend over to bow after a wonderful performance.  The clothing and head coverings must not obstruct the movement of the strings if the puppet is going to be manipulated easily.

Here is a little hint I learned many years ago from a doll costumer:  Use paper towels to design costume patterns.  Sheets from a roll work best.  The pattern pieces can be sewn together and fitted on the character and adjusted pretty much like fabric.  The best part is that the patterns that don’t work out well can be used to clean up your studio : ) 

 Next post – Balance

Ever curious,

Linda