Using Thickened Dyes and Paints on Fabric

My favorite method, which I used exclusively on my quilts, (“If Monet Could Quilt”) for example, is thickening the dyes or dye paints with Sodium Alginate.

Sodium Alginate is a natural product made from seaweed so it doesn’t react with your medium – it just thickens it to the viscosity you want. If you use it to make your paints a heavy cream consistency it holds a hard edge quite well and washes out nicely. It easily accepts  being painted over with another color for shading or value changes. It doesn’t matter whether the previous layer is damp or dry, but keep in mind that if the under layer is damp, the chances of bleeding increase.  This can be used to your advantage for blending effects like in watercolor painting, but can also ruin a hard edge that you worked so hard to achieve.

Using this method usually makes the use of other resists unnecessary. If you intend to do Imersion Dyeingit should be done prior to painting your design as the sodium alginate will not hold up under extremely wet situations.

The advantage of using sodium alginate is that it is colorless and relatively transparent so that your colors are not altered in the mix – what you see is pretty much what you get, and it dries without cracking.

You can purchase the sodium alginate from places like Dharma Trading Company or Pro Chemical Co – a small pkg. goes a long way.  Just remember to add the dye/paint to the thickener and not the other way around or else you end up with too much dye/paint. Ask me how I know. I use small glass custard cups to mix and LV – low viscosity alginate.

If you would like to learn more about using dyes or paints on textiles, I highly recommend Ann Johnston’s book Color by Design. I read this book from cover to cover and taught myself to use fiber reactive dyes to create my quilts. Her recipes and instructions are right on. The link gives you a glimps into this valuable book.

Color By Design excerpts.

I hope you will try using sodium alginate to achieve the results you need.

Always curious,

Linda

Hestia and the Log Cabin Block

Hestia, Greek Goddess of the Hearth, presided over Domestic Life.  She was the eldest daughter of the Greek Titans, Cronus and Rhea.  Hestia, although not a big name in mythology today, was one of the most important of the gods and goddesses in the Greek Parthenon.  She was rarely depicted in artwork, but was referred to as “Hestia First”.  This indicates how important keeping Hearth and Home as a sacred place was to the ancient people. 

Her Roman counterpart, Vesta, attended by the six Vestal Virgins was the sister of Zeus, Poseidon and Hades, and also keeper of the Sacred Flame. 

The tradition of the American Log Cabin Block is a small center square of red fabric representing the Hearth, center of the home.  The Log Cabin block has been arranged and re-arranged by many quilters, but each new look always begins with the small center piece, the Heart of the block, the Heart of the home.

In our busy lives today, we often forget how important the Hearth of the Home is.  It may not be a true hearth with a warming fire and cooking pots, but the need for a safe, warm and loving shelter has not changed over the centuries.

Perhaps we can take a little time to create a personal Log Cabin Block as a gentle reminder of what it is to be “Keepers of the Flame”.  You might put it in an area where you and your family gather to spend time together.  I think I’ll put my block on the kitchen table.  Where is the Hearth of your Home?   

Read more about Hestia on Wikipedia.org

http://en.wikipedia.org/wiki/Hestia  

Always curious,

Linda

Stenciling Lace

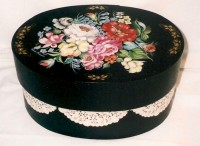
The trick to successfully stenciling lace is to think opposite of the regular stenciling technique.  The paints and tools are the same whether on fabric or wood, but the approach is very different.  A regular stencil has the pattern cut out of the stencil material, where as, the lace itself is the pattern and the holes are the negative space or background

If you want an abstract design of spots then pounce away.  If you want the finished product to look like lace some pre planning is necessary.   

Think background first.  Whatever color you are going to stencil on to the lace will not be the lace color, it will be the background color so it should match the background of the area on which you wish to put the lace pattern.

Think lace color next.  The area where you want to place the lace pattern must be the color you wish the lace to be.  Bearing in mind that you will need to cover all of this area with the stenciling pigment in order for the lace to shape correctly, you don’t want to make it any larger than necessary. 

For instance, in the photo above, I painted the area where I wanted the lace to be, white.  I stenciled with black through the holes of the lace (paper doily) and all around the shaped edges for about a half inch or so. That way I could then come back and bring the black background of the rest of the piece up to the black area I stenciled.   This is easier when painting on wood than  on fabric. 

A good way to achieve a nice effect on fabric might be to feather the paint from the edges of the lace outward getting lighter as you move away from the design.  The other alternative might be to create a band of background color just where the lace is.

In any event, a little pre planning, a good and dry stencil brush and some practice will give you a wonderful effect.

Ever curious,

Linda

Painting with Dyes on fabric requires a Watercolor Approach

Water color paint, fabric dyes and dye paints have very similar qualities.  All three of these mediums are applied primarily as liquids and are relatively translucent and stain the surface.  Oil and Acrylic paints, in comparison, are more viscous and opaque allowing them to lay on top of one another and the surface. 

With Oil and acrylic paints you can easily work from back to front.  This means  that the darkest values can be placed on the surface first, then the medium values can be added with highlights as the final touches.  Pre-planning of color placement can be more spontaneous and errors are more readily corrected.  If you want to paint something white, you use white paint.  

Watercolor painting and painting with dye or dye paint, on the other hand, requires that you work from front to back planning the placement of highlights and the lighter values before you even touch the surface.  These areas must be preserved by masking or working carefully around them.  If you want to have something be white, you must leave the white of the surface showing.  Once the pigment hits the surface, it is there for good.  Errors must be masked by altering the design or forgiven. 

To maintain a Hard Line of color with watercolor and dye/dye paint, great care must be taken to make sure you are not working into, or next to a wet area.  The  loading and preparation of your brush before touching the surface is also vital  in order to prevent bleeding where you don’t want it.

I find that because of the many similarities between watercolor painting and using dyes and dye paints on fabric, a familiarity of  basic watercolor techniques helps a textile artist make an easy transition into controlled dyeing. 

 Here is a link to some free tutorials to get you started.

 Free Watercolor Painting Tutorials: How to paint, Hints, Tips, Techniques.

Ever curious,

Linda

Textiles of the Twenty-First Century

 Fiber as we have known it for centuries is rapidly changing before our very eyes. 

It doesn’t seem that long ago that fibers created in test tubes – acrylics and polyesters – were the miracle discoveries.  Since then test tube fibers have brought us life saving materials that are  insulating, waterproof  and bullet proof.   We now have optical fibers that transmit electronic signals enhancing our communications and fibers that have memory.  What could possibly be next.  Well, I read a wonderful article in Fiberarts Magazine  which describes the cutting edge  research of e-textiles.  These are truly miracle fibers that can transmit light, data, sound and power.  Just think of the possibilities.  Listed below is the referenced article and a link to the magazine – highly recommended for all fiber artists.  

E-TEXTILES: ELECTRONIC AND EXTRAORDINARY

by Janet Collins

In the growing field of electronic textiles, two university campuses in North America are emerging as epicenters for groundbreaking research and experimentation.

via Fiberarts Magazine > January/February 2010.

Ever Curious,

Linda

The learning curve

Well, I have been at this for a while and I must say that the learning curve is huge 🙄

If I didn’t have the help of my wonderful son and the support of my husband, this project would never have happened. 

Ever curious,

Linda