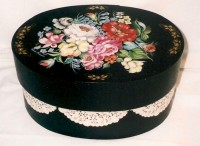
 The trick to successfully stenciling lace is to think opposite of the regular stenciling technique. The paints and tools are the same whether on fabric or wood, but the approach is very different. A regular stencil has the pattern cut out of the stencil material, where as, the lace itself is the pattern and the holes are the negative space or background.
If you want an abstract design of spots then pounce away. If you want the finished product to look like lace some pre planning is necessary.
Think background first. Whatever color you are going to stencil on to the lace will not be the lace color, it will be the background color so it should match the background of the area on which you wish to put the lace pattern.
Think lace color next. The area where you want to place the lace pattern must be the color you wish the lace to be. Bearing in mind that you will need to cover all of this area with the stenciling pigment in order for the lace to shape correctly, you don’t want to make it any larger than necessary.
For instance, in the photo above, I painted the area where I wanted the lace to be, white. I stenciled with black through the holes of the lace (paper doily) and all around the shaped edges for about a half inch or so. That way I could then come back and bring the black background of the rest of the piece up to the black area I stenciled. This is easier when painting on wood than on fabric.
A good way to achieve a nice effect on fabric might be to feather the paint from the edges of the lace outward getting lighter as you move away from the design. The other alternative might be to create a band of background color just where the lace is.
In any event, a little pre planning, a good and dry stencil brush and some practice will give you a wonderful effect.
Ever curious,
Linda

